Easter Bunny Oreo Cookie Pops — Easy Steps and Decorating Tips
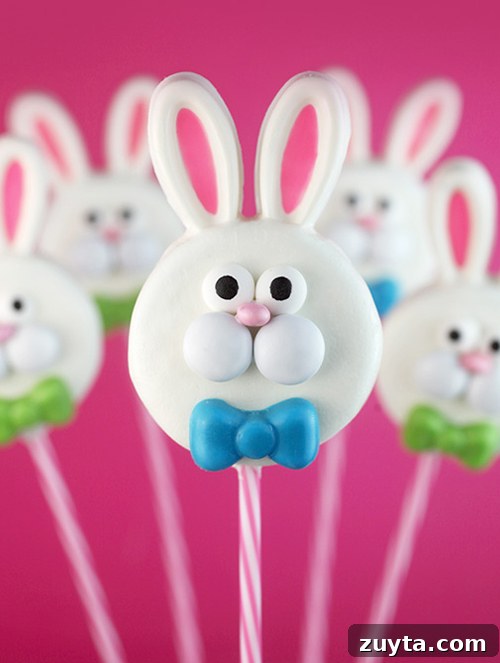
I decorated a few more Oreos and turned them into playful Easter bunny cookie pops. These little treats are simple to make and perfect for parties, classroom snacks, or a festive dessert table. Below you’ll find step-by-step instructions, tips for molding ears and bows, and ideas for decorating so your cookie pops look as cute as they taste.
Tools and Molds
I used the Playful Shapes Mold to make the bunny ears and bow ties; it’s handy for consistent shapes and clean edges. The same mold includes mustaches, eyeglasses and flower petal shapes that can be repurposed for other decorations—I’ve seen the eye and mustache shapes used for quirky bunny cookies and the petal shapes turned into turkey feathers by creative bakers.
How to Mold the Bunny Ears
Fill the center of the ear cavity with melted pink candy wafers and let that layer set. Then fill the remainder of the cavity with white candy wafers and tap the mold to level the coating. Place the mold in the refrigerator for a few minutes to speed up setting, then carefully remove the shapes by pressing and twisting the mold over a towel. If you don’t have a mold, you can pipe ear shapes onto wax paper: pipe the pink center first, allow it to dry, then pipe white around it to finish. The front will look clean with a pink center while the backs may be slightly uneven—still fine for attaching to cookie pops.
Assembling the Cookie Pops
Separate the Oreos and dip the end of a pop stick into melted candy coating. Press the stick into the creme center and rejoin the cookies, adding a little extra coating at the base of the stick if you want extra security. Allow the base to set before dipping the entire cookie. Dip each cookie completely in melted white candy coating and let excess drip off. Work over a rack or parchment to catch drips and make cleanup easier.
Dip the bottom of two pre-made ear shapes in coating and position them at the top of the coated cookie to create the bunny ears. Do this one ear at a time and hold each ear briefly so it adheres; if the coating begins to harden before the second ear is placed, rewarm a tiny amount of coating to use as glue. Place the pops in a stand to dry completely before decorating.
Decorating the Faces
For faces I used a mix of small candies: white M&Ms or candy gems for cheeks, pastel sunflower seeds for tiny pink noses, and DIY sugar eyes for character. I also made small bows using the same Playful Shapes Mold. Attach these candies with a dab of melted white coating; once set, they’ll stay in place. Finish by drawing pupils or additional facial details with an edible black ink pen.
When attaching small pieces, less is more—use small dots of coating so decorations sit cleanly and don’t slide. If a piece shifts, lift it off while the coating is still tacky and reattach with a fresh dot of melted coating.
Make-Ahead and Variations
Make molded shapes ahead of time to save work on the day you plan to decorate. Store molded chocolate or candy shapes in a cool, dry place in an airtight container. Cookie pops can be dipped and set a few hours before serving, but for best texture make them the same day you plan to enjoy them.
Once the ears are in place, the front of each cookie becomes a blank canvas—try heart-sprinkle noses, confetti sprinkle eyes, mini-marshmallow cheeks, or colored sugar for whiskers. Swap colors to match your party palette or holiday theme.
Final Notes
These bunny Oreo cookie pops are playful, simple to customize, and great for gifting or serving at seasonal gatherings. Take your time with assembly and allow coatings to set properly between steps for the cleanest results. Enjoy making—and sharing—these adorable cookie hoppers!
Here’s “hopping” you enjoy these cookie cuties.